Various Ink Background - Tutorial
My buddy Zoe told me about an watercolor class that she was taking. i thought I too would give it a try. I hadn't watercolored since a brief encounter with college. I found that I am very impatient and had a hard time waiting for the paint to dry, literally! It got me thinking...what if I did a similar technique using Copic Various Ink refills. I had to change up some of the process but loved the results. Zoe recommended trying some lighter colored Various Inks saying I could possibly get a more watercolor-like look. Next time I will give it a try but in the mean time I thought I would share my process in making these cards.


Supplies Needed:
WaterColor Paper (cold press 140 LB)
Stamp block about card size (or nonstick craft mat)
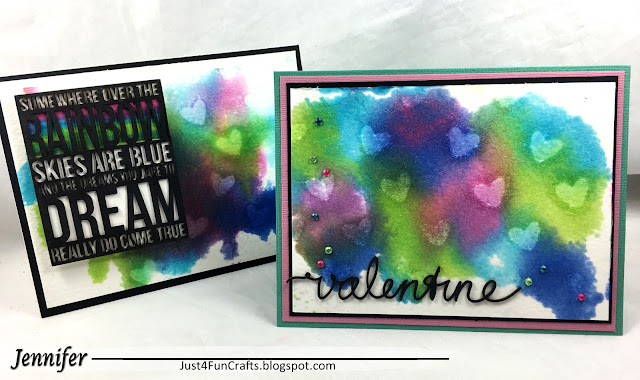
Different Various Ink Refills (BG06 YG25 B26 RV66)
Mini Mister with Blender Solution
Stencil (Heart stencil)

Set the stamp block on scrap paper to contain any mess that might potentially happen to any artist.
Using Various Ink refill colors of your choice put random a drop or two all over the block. The ink will slowly pool together. Make sure you do not use colors that may tend to get muddy looking when combined unless that is the look you want to achieve.

Now get out your Blender Filled mister bottle (make sure you aim it toward the block and not your face...been there done that). Generously spritz the ink on the block and then carefully lay your watercolor paper on the blog to soak up the ink. After a few moments remove the watercolor paper and set the block aside. Take a look at your inked piece of art and decide which direction you would like to use it for your card. You will want it to completely dry before the next step (which shouldn't take long).

Lay your inked creation on the scrap paper and lay down a stencil on top of it. Using the mister filled with Blending Solution spritz of the top. Once you have spritzed it once let it completely dry and repeat. Do this 3 or 4 times until the stenciled shapes stand out. You can now remove the stencil. *note - tape down the stencil if you feel you might move it during this process.

Your creation is complete. Now its time to whip up a card.
For finishing card:
Cardbase
Multiple Cardstock mats
A chipboard sentiment (MakeItCrafty)
Black (100) Copic marker
Choose a sentiment. I chose a chipboard sentiment from MakeItCrafty. (You could also use a die or even emboss something).

I colored my chipboard using a black (100). The WiNK's also color very nicely on chipboard. Using the X-Press IT fine glue pen I adhered the chipboard to the card front. You can layer your card as desired. I do like to pop up the front of the card to add dimension using foam tape. Here is a closeup of the completed cards.


- ENJOY!
Jennifer Dove


Comments