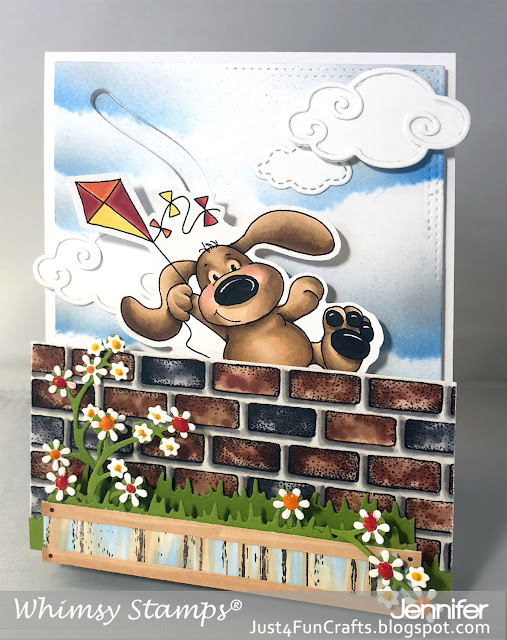
Up Up and Away
How adorable is this Doggie and Kite! I submitted this card for a magazine and it didn't get published (I know GASP), so you get the pleasure of some step-by-step instruction on how to create it. How cool is that?!
I love how you can use Whimsy's Brick Background to create the "wall" for this card!
I also used the Farmhouse Shiplap Background stamp to create the flower box.
Whimsy Products:
Coloring Medium: Copics
Dog – E53 E55 E57 E59, R20, C10
Kite – R24 R29, YR04 YR09, Y15
Bricks – C1 C3 C5 C7, E31 E35 E37
Planter – E31 E33 B21
Sky – B24 N2
Card size: A2 Mountain Fold
Other Supplies used: Memento Tuxedo Black stamp pad, cutter, liquid adhesive, tape runner, foam pop-up tape, Scissors, Nuvo Crystal Drops (Ripened Pumpkin, Red Berry, English Mustard), die cut machine, white cardstock, green cardstock
· Color clouds on compatible white cardstock.
· Die cut cloud background using largest rectangle die from Shaker Maker Combo die
· Die cut the slider using largest slider piece from the Slip ‘n Slide die set and both small circle dies from set.
· Pop up the rectangle cloud piece layer using a single layer of foam tape onto the card base.
· Adhere the cut out slider piece insert within the slider window, directly on card base.
· Create the slider mechanism using a single layer of 1/4 inch foam pop-up tape sandwiched between the two small die cut circles and slide into the die cut opening with one circle inside and one on top of slider opening.
· Color Doggie and Kite with your favorite coloring medium and cut out.
· Adhere image to exposed slider circle. Check to make sure slider works and the image is in a desired position both up and down.
· Color Brick Wall background and cut to desired size. (2 1/4 x 4 1/4)
· Pop up the brick wall with a double layer of pop-up foam tape onto cloud base layer. **Make sure you do not block slider area with foam tape.
· Cut out clouds using cloud die. Adhere some to card front with tape runner and pop-up one of the clouds if desired. Keep pop up cloud single layer to not block slider mechanism.
· Create a flower box by cutting a 3/4 X 10 inch strip of paper. Stamp with the Farmhouse Shiplap background stamp. Color with favorite coloring medium.
· Score strip at 2 3/4, 2 7/8, 3, 6 1/2, 6 5/8, 6 3/4
· Fold a mountain fold at first score, valley fold on second score and mountain on third score. Repeat on other side. End pieces should overlap. Adhere together. You have just created a flower box for your card that can collapse down for mailing. Neat huh?
· Glue to front lower portion of the card with the overlap being hidden towards the back.
· Add thin strips of paper in complimenting color for Flower box edging to complete the look.
· Cut strips of grass with the green cardstock and embellish flower box and lower card front.
· Die cut flower stems using Christmas Branches die and adhere inside flower box
· Die cut flowers using the Shaker Maker Combo Die set and adhere to the stems
· Add Nuvo Crystal drops to the flowers


Comments