The Black Cat - DreamWeavers Inspirational Challenge
The Dream Team has a big day today! Not only are we into week three of our Pinterest Inspired challenge, we are also playing with Ranger's Stickles Dry Glitter in the mix! We've had so much fun playing with jars of sparkly goodness, that we want to share the fun with two lucky crafters!
Just visit everyone on the list below, and leave comments for everyone. Two winners* will be randomly selected and announced Thursday, July 4th...what a great day for a celebration! Each prize package includes a mix of five Ranger Stickles Dry Glitter, a mix of six Dreamweaver Stencils, and jar of Dreamweaver Translucent Paste, and a Palette Knife for spreading. If you want to add to the fun, play along with our Pinterest challenge and link your own creation to the linkytool on the Dream It Up! blog before July 1st for a chance to win this month's stencil prize. Here's the list of sparkly-Pinteresting players at the bottom of the post for you to enjoy! Be sure and comment!
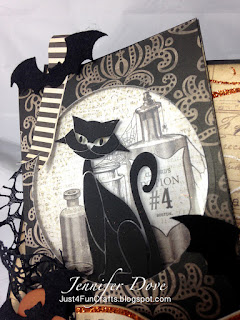
For this challenge we are to use something that is inspired from Pinterest. I didnt have any ranger but thought i would sneak in anyway. I couldn't resist playing with the Retro Sitting Cat from DreamWeavers. The paper packet by My Minds Eye I had sitting around was so perfect with this spooky cute cat. I have never used the DreamWeavers paste on acetate, so I thought I would experiment and see if it worked. IT WORKED LIKE A CHARM! If you would like to see the Pinterest Inspiration you can see it HERE.
I laid the stencil on the acetate and taped it on all 4 sides so it wouldn't move. I spread a generous layer of the black mat paste and then using the scraper tool scraped off the excess. I removed the tape and gently lifted off the stencil. It is very important to wash the stencil and tools right away or the paste will be hard to remove. I set it aside to dry (which doesn't take long in Arizona). I cut a circle out of a card front and then adhered the cat to the inside cover. I then placed fun pattern paper on the inside and using foam tape I popped up the front from the back of the card. I proceeded to then do my many layers adding my new favorite MayArts ribbon. I love how this card turned out and will display it year round, cause thats the kinda girl I am.


.jpg)


Comments
kren@http://afourthlife.blogspot.com
stamping sue
http://stampingsueinconnecticut.blogspot.com/
Thanks so much for sharing your talent.
Sue Brailey